Using Selections
Explanation
Use Selections to name a set of objects you would like to revisit later, e.g. a set of supplier invoices, customers etc.. The contents of your selection
will not change until you manually add or remove objects to/from it. The selections you create are
personal and stored in your user profile.
There are several options to reach your selections.
- From the Navigator right under the node of the page where you created
the selection. This means it's easy to create a shortcut for the selection,
read more about
Using Shortcuts.
- From the Breadcrumb navigation, in the drop-down list for the page where
you created the selection
- From My Administration/Selections. From here you can
manage all your selections. There are options to rename,
edit and delete, send your selections etc.

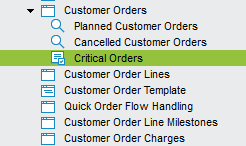
Figure 1: Selections are available directly from the Navigator Structure.
Creating Selections
Prerequisites
N/A
System Effects
N/A
Window
Selections
Related Window Descriptions
Selection
Viewer
Procedure
- Open the page where you want to create a selection and populate/search
for data. Supplier Invoices, customers etc.
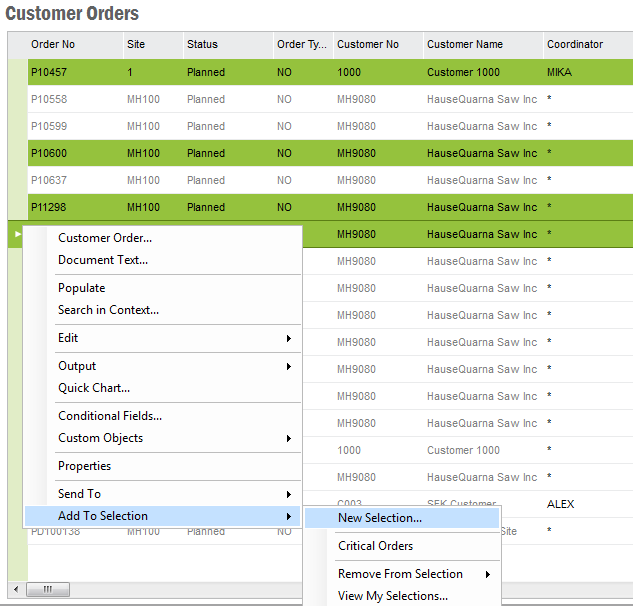
- Highlight the objects you want to include in the selection and choose
Add to Selection/New Selection from the context menu. Note that you
highlight a set of objects by holding the Shift key or a separate
objects by holding the Ctrl key.

Figure 2: Create Selection
- A dialog box is displayed where you enter the name and description for
the selection Click OK to create the selection. It will now be
visible in the navigator and you can start using it.
There are several options to reach your selections.
- From the Navigator right under the node of the page where you created
the selection. This means it's easy to create a shortcut for the selection,
read more about
Using Shortcuts.
- From the Breadcrumb navigation, in the drop-down list for the page where
you created the selection
- From My Administration/Selections. From here you can
manage all your selections. There are options to rename,
edit and delete, send your selections etc.

Figure 3: Selections in My Administration
Via the context menu you have the following options:
- Open List. This will open the selection and present all included
objects.
- Open Details. This will open the selection and present all
included objects in a detailed page. E.g. if you created the selection from
the Customers (overview) page, this action will present the selection
in the Customer (details) page.
- Open List in New Window. This will open the selection and present
the included objects in a new window.
- Open Details in New Window. This will open the selection and
present all included objects in a detailed page in a new windows.
- Delete: This will delete the selection from the user profile.
- Rename/Notes: This will open the Rename Selection dialog where
you can rename or update notes.
- Show Notes: Expands the list of selections and displays the notes.
- Send To.: Here you have the options to send the selection in an
email or in a task. Read more about
Send to
option and Tasks
- Add to Selection. This makes it possible to create a selection
including your selections.
- Open the page where you have objects you want to add to a selection and populate/search
for data. Supplier Invoices, customers etc.
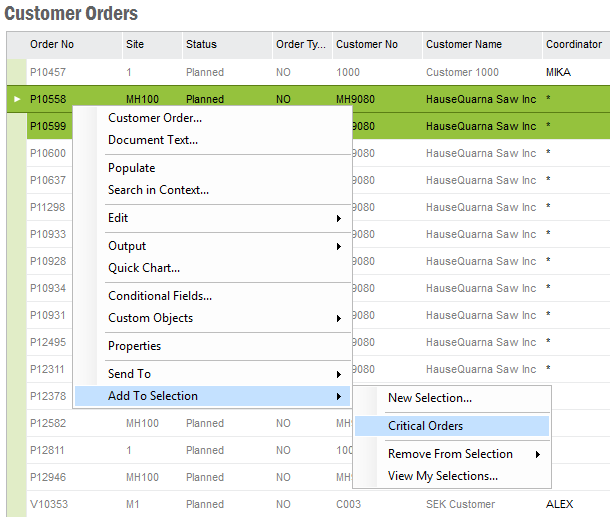
- Highlight the object(s) you want to include in the selection and choose
Add to Selection. In the context menu you will see all your existing
selections for that page, select which selection to add the objects to. Note
that you must refresh the selection to see the added objects.

Figure 4: Add To Selection context menu shows all existing selections for
the current page
- Open an existing selection
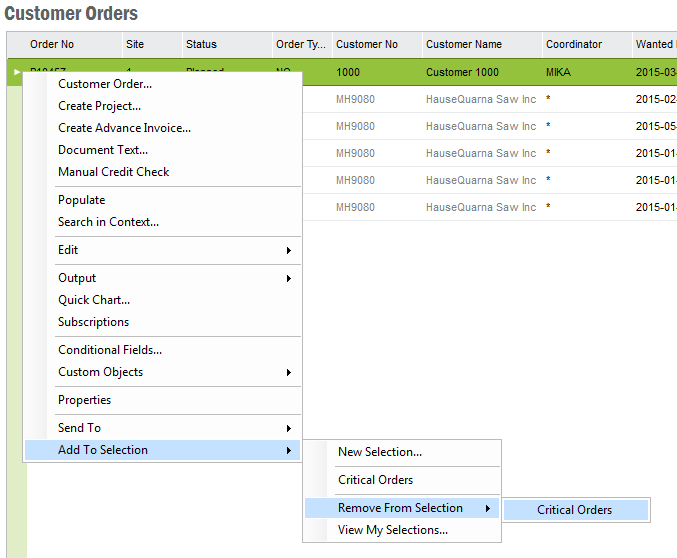
- Highlight the objects you want to remove. Open the context menu via
right mouse button and select Add to Selection/Remove from
Selection. Your selections connected the current page are presented in a drop down list. Choose the Selection
you want to remove your selected object(s) from.

Figure 5: Removing selected objects from an existing selection


